I'm just like everyone else this time of year when it comes to Christmas decorations. While I love to pick up a few new items along the way to add to my Christmas collection, I also like to get my creative juices flowing and do a few DIY (do it yourself) projects during the season.
Showing posts with label diy ideas. Show all posts
DIY: Holiday "Joy" Sign
Thursday, December 1, 2016
I'm just like everyone else this time of year when it comes to Christmas decorations. While I love to pick up a few new items along the way to add to my Christmas collection, I also like to get my creative juices flowing and do a few DIY (do it yourself) projects during the season.
~The Art of Home Design Series~
Friday, September 4, 2015
Happy Friday Friends!
I'm making a quick stop onto the blog today to share some exciting news about the fun Art of Home online course I will be attending soon.
The e-course is being offered by Jeanne Oliver and some of my favorite, crazy talented, bloggers are contributing as well. Have you reserved your spot yet?
I cannot wait to see what Jeanne, Lissa, Bre , Jennifer and Kennesha have to share with us. The series of classes will offer so much inspiration, and we will get a closer look into the lives of these amazing women....I cannot wait!
Tuesday Tours: Farmhouse Style!
Tuesday, May 12, 2015
Welcome to the first edition of Spindle & Rye "Tuesday Tours"
I'm super excited to be adding this weekly feature to my blog, because if you are like me, you love getting a little "sneak peek" into the homes of some of your favorite bloggers and Instagram friends.
I couldn't be happier to kick off this new series by showcasing the home of my super special friend, Daraka McCrackin. Daraka lives in Oklahoma, is married to her high school sweetheart, and is a stay at home Mom to three sweet little girls.
Daraka and I met through Instagram about a year ago and we have been great friends ever since. Do you know how you just instantly connect with someone? Daraka loves to antique, shop at thrift stores, and have fun with DIY projects. We love the same farmhouse/industrial decor, have the same sense of humor, and we talk on the phone and text each other about 50 times a day. It's been so fun getting to know her and I'm thrilled every time she mentions "do you wanna do a DIY project together"?
If you're not already following her on Instagram, I can honestly say you are missing out! I'm sure you will love her and her home as much as I do!
Yea, I'd say this sister is my #soulsister.
Grab a cup of coffee (or drink of your choice) and sit back and relax as Daraka shares with us what makes her house a beautiful home.
Our home was originally
built by my husbands grandparents. They were the first to build in this area
back in the 60's. As a result our last name is the same as the street we live
on.
We are currently in the process of renovating our basement.
I repurposed this old window into a photo frame
in our entryway.
I found this old
accordion hanger at a thrift shop for 50 cents. I took these old galvanized buckets and stenciled numbers on them and filled them with vintage maps.
This old igloo water
cooler houses outdoor items like chalk and jump ropes for my girls. We store
shoes in the basket and use the hooks for small coats.
My family gallery wall in
my living room is my favorite. I found all the frames except for the 3 big ones
at garage sales and thrift shops. I painted them to better fit my style.
This is my spot in my
living room. This side table was part of a rattan furniture set that we
inherited. I love the uniqueness of it. The bottom shelf holds small games for
family night.
Our mantle is probably my
favorite thing we have added to our home. It is from a old barn in the 1800's.
It still has the sawmill marks on it which I love.
My collection of old
whiskey jugs sit on the other side of the mantle.
My bookshelves house all
my favorite vintage items that I found at antique shops and flea markets, and an old wire basket holds vintage quilts.
My dining room has
quickly became my favorite room to sit in. I love it all from my collection of
milk glass to my French linen stripe bench I found at a vintage market.
I found the
"apothecary" sign at the same vintage market I found my bench.
We keep a growth chart on
the wall that my husband made for me to measure all my girls throughout the
years.
This gallery wall in my
dining room is made with more unique items. From a ruler made into a letter
"M" to the display case of arrowheads my husband has found, every
piece has special meaning behind them.
This gallery wall is in
our hallway. It is made entirely with thrift store pictures and frames.
I found this top Native
American picture in our house after we bought it. It is drawn entirely with
pencil.
I love decorating our
home with unique and thrifted items. I found this old painting hanging in a
garage. A little clean up and it made the perfect addition to our small
bedroom.
With our home being older and small our three
girls share two bedrooms. For that reason I keep their decor minimal and
functional.
I found these shelves on
clearance for 1 dollar each. I bought the polka dot ribbon and added it to the
front to make them cuter.
This is a small desk
area I created for them to work on their homework. Their rooms had sliding wood
closet doors which I painted with chalk paint.
I painted our cabinets a dark grayish blue then
went over with a glaze. I wiped the glaze as I went making a worn look. Our countertops are
concrete and were installed with a rough edge. I absolutely love them.
I wanted something unique
for my cafe curtains so I bought a vintage grain sack and cut it at the seams.
This is the view from
our back deck and our kitchen. Living on the lake has its perks!
Inspire me DIY: Grow Your Own Herbs in a Can
Monday, April 27, 2015
Happy Monday friends!
If you follow me on Instagram (@colletteosuna) you already know that myself & nine other bloggers (<—–crazy talented by the way)
are participating in an Inspire Me DIY challenge hosted by the super sweet Kennesha of Restoration House.
Kennesha challenged us to show you how we Do it Yourself & hopefully inspire YOU to cross some projects off your own “to do lists”.
We want you to love your home right where it is, but with a little DIY upgrading.
Everyone has been hard at work on our projects, and today is the big reveal day!
We want you to love your home right where it is, but with a little DIY upgrading.
Everyone has been hard at work on our projects, and today is the big reveal day!
Be sure to check out the other blogger links at the bottom of this post to peek at what they have been up to, & search the hashtag #inspiremediy to follow along for great inspiration on Instagram.
We can’t wait to see what YOU do!
I had a few DIY ideas that I considered for this challenge & finally decided on these fun “grow your own herbs in a can”.
The main reason being that I already had everything in my home to complete this project except the actual herbs, (I bet you do too) and of course they are super cute!
The inspiration for my DIY project came from these herb cans that I’ve walked by a gazillion times at Michaels’.
I’ve seen photos of the store version flying around Instagram by others who love them as much as I do.
I thought they were adorable, but there was no way in you know where, I was paying $14.99 for EACH can. They are super cute, but I just couldn’t see spending $45.00 on three cans of fake herbs.
I knew I could do a little better…..and for under $10.00, I was able to create my own knock off version with fresh herbs that I can use for cooking!
Supplies You Need:
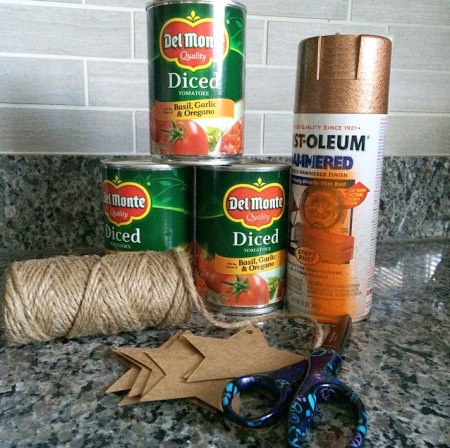
Three tin cans from canned goods. I used tomatoes that I already had for .69 cents each
Spray paint in your choice of color. I used hammered copper paint that I got for FREE at Home Depot! My Home Depot store gives away free spray paint, you just have to ask if they have any at the paint counter. Very cool!
Twine (to thread the tag through and tie around the can)
Scissors
Cardboard stars (or any other shape). I picked up mine at Michaels’ for under $1.00 using a 40% off coupon
Black Sharpie (for writing herb names on the tag)
Black construction paper (cut into 3″ strips to wrap around the can)
Clear Tape (to hold the black construction paper in place on the can)
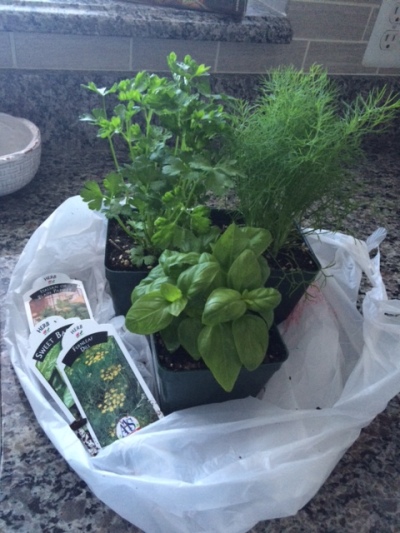
Three herbs of your choice (I used Dill, Parsley & Basil because we “rock out” these herbs at our house!)
This super easy DIY starts off with choosing your can size. I used 14.5 ounce cans, but you can use larger cans, depending on the herb size you want to grow. I removed the labels from the cans, washed the insides thoroughly, & soaked off any remaining label glue in hot water.
I turned the cans upside down and gave them a quick coat of Rustoleum Hammered Copper spray paint. Remember to stand about a foot away from the cans using quick, even strokes. After the paint dried overnight, I flipped them right side up & applied another coat of spray paint, being sure to paint the very top of the can rim and about 1/4″ inside the can.
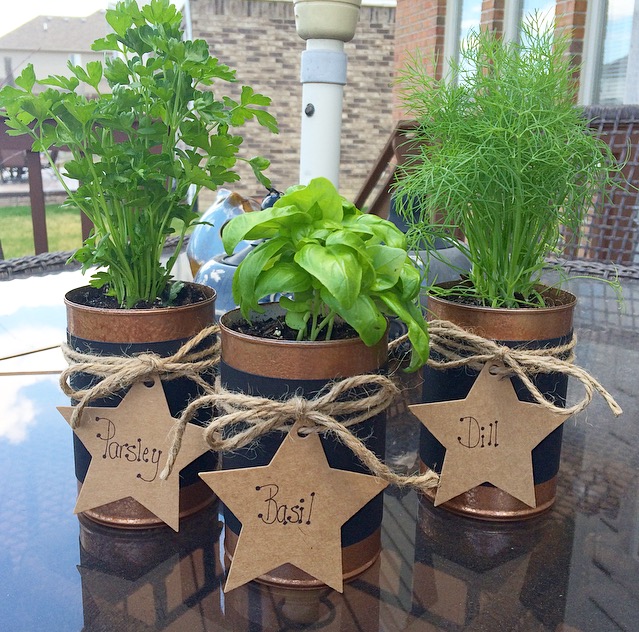
In order to give my cans a more “authentic look” of the Michaels’ version, I cut black construction paper into 3″ strips & wrapped it around the center of each can. Use clear tape to secure it to the back of the can.
I labeled my star tags using a black Sharpie marker & threaded each one through a cut piece of twine, about 24″ long.
Holding the tag on the front of the can, wrap the twine around two times, and finish off with a bow.
Finally, carefully remove your herbs from their containers & place gently inside each can.
I was able to find my herbs at a local garden center this weekend for the great price of $2.29 each!
There you have it…..a super simple DIY that anyone can do!
I really love how my herb cans turned out & I can’t wait to start using the fresh herbs in my Summer grilling recipes!
Visit the links below to see my fellow bloggers reveal their #inspiremediy projects!
Restoration House
Thoughts From Alice
House Seven Blog
My Sweet Savannah
This That & Life
Ms. Craftberry Bush
Simple Stylings Blog
City Farmhouse Blog
Jen Migonis Home Blog
Restoration House
Thoughts From Alice
House Seven Blog
My Sweet Savannah
This That & Life
Ms. Craftberry Bush
Simple Stylings Blog
City Farmhouse Blog
Jen Migonis Home Blog
Labels:
container herbs,
crafting,
crafts,
decor,
DIY,
DIY & Crafts,
diy herbs,
diy ideas,
diy projects,
handmade,
herbs,
home,
home decor,
home projects,
homemade,
inspiration,
interior decorating,
spray paint,
twine