Spindle & Rye: DIY & Crafts
Showing posts with label DIY & Crafts. Show all posts

Who Am I?

Sunday, January 31, 2016

I have a layout published in this awesome idea book by Memory Makers

In keeping with my blog promise to learn more about me in the New Year.....I would like to introduce you to "my previous self". Hello, my name is  Collette Osuna, a published scrapbooker.

After my son Alex passed away in 2000, I turned to scrapbooking as a form of creative release and healing. At that time, I could have never imagined the amazing opportunities that would be headed my way.

How To Re-Purpose Pallets

Friday, January 29, 2016


How many times have you driven through a parking lot and saw a pile of pallets near a dumpster to be thrown away? Did you really ever give them a second thought?

 I've never really thought of all the useful ways these wood pieces could be recycled and used as home decor elements. 

Cold Weather Skin Survival Tips

Tuesday, January 26, 2016

This shop has been compensated by Collective Bias, Inc. and its advertiser. All opinions are mine alone. #WetSkinMoisturizer #CollectiveBias


Let's face it, if you live in a cold weather area, you already know that winter weather can be cruel to your skin. I live in Michigan, and right around the month of November, I can literally feel the moisture escaping my skin the minute I walk out the front door. That cold wind is whipping at my face and hands.....and it's no joke!

Re-Purpose Hipster

Friday, January 22, 2016


Happy Friday folks!

I'm always on the lookout for ways to help our mother earth, and recently came across some great ideas to implement the three "R's" into my life; Recycle, Reuse, Re-Purpose.


DIY: Bird Seed Ornaments

Saturday, December 5, 2015


Michigan winters can be rough, especially for my feathered friends who like to hang out in the trees in my backyard. I'm a bird lover by nature. I hang several of my mason jar bird feeders throughout my yard all year round. Afterall, their hunger doesn't stop for the birds just because it's cold outside.

I have been making these DIY Bird Seed Ornaments for years, They pull double duty. They help keep the birds fed through the cold winter months, and look super cute hanging from my mini Christmas tree next to my deck.

These DIY bird seed ornaments would really make thoughtful Christmas gifts for bird lovers on your holiday list. Just wrap each one in kraft butcher paper, and set inside a burlap bag or small box wrapped in twine.

Blogger Link Love: 10-26-15

Monday, October 26, 2015


Happy Monday Friends!!

Welcome back to another week of Blogger Link Love.
Each Monday I will showcase my favorite blog posts that I read and loved from the week prior and share their links here.

This is such a great way to discover new blogs and meet new friends! Be sure to stop by these blogs to check out their posts and add them to your reading lists. You won't be disappointed!

Please be sure to link up YOUR blog post using the widget below so I can stop by and take a peek and possibly feature you here next week!


Shovan from Shobella Chic shares her Spicy Pumpkin Seed Recipe

Yuni from Love Your Abode shows us her amazing bedroom transformation

Jen at Style House Interiors shares some tips for last minute fall decorating

Janet from the Garnished Home shows us her kitchen remodel on a budget

Jolia from Farm Fresh Homestead shares beautiful Summer Ellis jewelry

Kate & Chelsea from Style Mutt Home share some fun ways to use belts in your home decor


"Hi Impact Radius"


~Blogger Link Love: 10-19-15~

Monday, October 19, 2015


Happy Monday Friends!!

Welcome back to another week of Blogger Link Love.
Each Monday I will showcase my favorite blog posts that I read and loved from the week prior and share their links here.

This is such a great way to discover new blogs and meet new friends! Be sure to stop by these blogs to check out their posts and add them to your reading lists. You won't be disappointed!

Please be sure to link up YOUR blog post using the widget below so I can stop by and take a peek and possibly feature you here next week!


Shannon from Fox Hollow Cottage shares her fun mantle all decked out for Halloween

Chloe from Boxwood Avenue shows us these fun DIY Halloween bags & paper straws

Sandra from The Rustic Life shares an amazing recipe for Salted Caramel Apple Martinis

Becky from Buckets of Burlap shows us how she adds farmhouse style using corbels

Chris from At Home With Chris B shares how she painted her outdated kitchen cabinets white

Carol from Arts & Sands layers her gorgeous home for fall


Easy DIY Fall Banner

Wednesday, September 30, 2015


Painted Fox- doughbowl

Hey there Fall Lover!

Who's ready for a really fun and fast DIY Fall project?
I've been seeing so many cute Fall banners all over Instagram lately, that I decided to make one myself. I wanted to spruce up my black fireplace box and this banner is the perfect touch.

Don't get me wrong.....I love the cute banners I've spotted in the Target One Spot but thought it would be fun to customize the banner words and make good use of some leftover scrapbook paper I had on hand.


Inspire me DIY: Grow Your Own Herbs in a Can

Monday, April 27, 2015


Happy Monday friends!
If you follow me on Instagram (@colletteosuna) you already know that myself & nine other bloggers (<—–crazy talented by the way)
are participating in an Inspire Me DIY challenge hosted by the super sweet Kennesha of Restoration House.
Kennesha challenged us to show you how we Do it Yourself & hopefully inspire YOU to cross some projects off your own “to do lists”.
We want you to love your home right where it is, but with a little DIY upgrading.
Everyone has been hard at work on our projects, and today is the big reveal day!
Be sure to check out the other blogger links at the bottom of this post to peek at what they have been up to, & search the hashtag #inspiremediy to follow along for great inspiration on Instagram.
We can’t wait to see what YOU do!

I had a few DIY ideas that I considered for this challenge & finally decided on these fun “grow your own herbs in a can”.
The main reason being that I already had everything in my home to complete this project except the actual herbs, (I bet you do too) and of course they are super cute!

The inspiration for my DIY project came from these herb cans that I’ve walked by a gazillion times at Michaels’.  
I’ve seen photos of the store version flying around Instagram by others who love them as much as I do.


I thought they were adorable, but there was no way in you know where,  I was paying $14.99 for EACH can. They are super cute, but I just couldn’t see spending $45.00 on three cans of fake herbs.

I knew I could do a little better…..and for under $10.00, I was able to create my own knock off version with fresh herbs that I can use for cooking!


Supplies You Need:
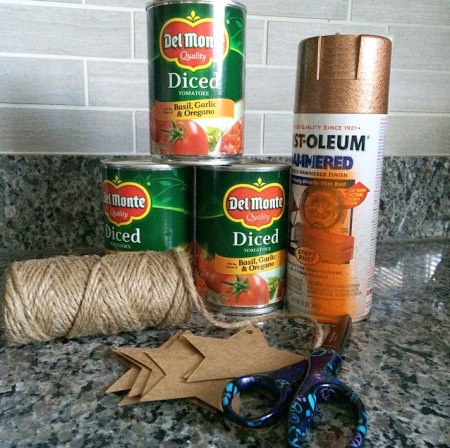
Three tin cans from canned goods. I used tomatoes that I already had for .69 cents each
Spray paint in your choice of color. I used hammered copper paint that I got for FREE at Home Depot! My Home Depot store gives away free spray paint, you just have to ask if they have any at the paint counter. Very cool!
Twine (to thread the tag through and tie around the can)
Scissors
Cardboard stars (or any other shape). I picked up mine at Michaels’ for under $1.00 using a 40% off coupon
Black Sharpie (for writing  herb names on the tag)
Black construction paper (cut into 3″ strips to wrap around the can)
Clear Tape (to hold the black construction paper in place on the can)
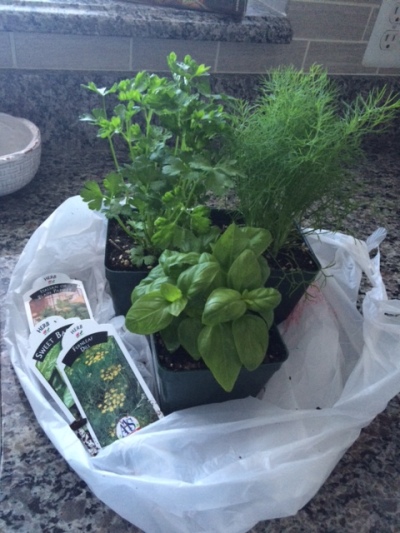
Three herbs of your choice (I used Dill, Parsley & Basil because we “rock out” these herbs at our house!)
This super easy DIY starts off with choosing your can size. I used 14.5 ounce cans, but you can use larger cans, depending on the herb size you want to grow. I removed the labels from the cans, washed the insides thoroughly, & soaked off any remaining label glue in hot water.
I turned the cans upside down and gave them a quick coat of Rustoleum Hammered Copper spray paint. Remember to stand about a foot away from the cans using quick, even strokes. After the paint dried overnight, I flipped them right side up & applied another coat of spray paint, being sure to paint the very top of the can rim and about 1/4″ inside the can.
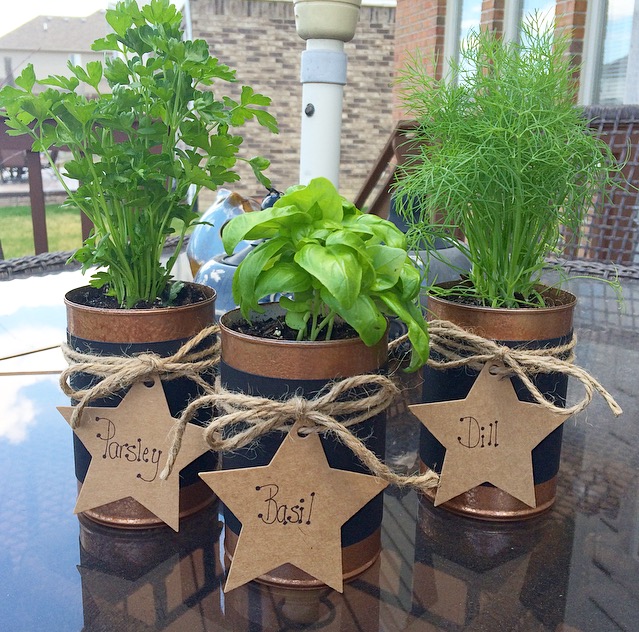
In order to give my cans a more “authentic look” of the Michaels’ version, I cut black construction paper into 3″ strips & wrapped it around the center of each can. Use clear tape to secure it to the back of the can.
I labeled my star tags using a black Sharpie marker & threaded each one through a cut piece of twine, about 24″ long.
Holding the tag on the front of the can, wrap the twine around two times, and finish off  with a bow.
Finally, carefully remove your herbs from their containers & place gently inside each can.
I was able to find my herbs at a local garden center this weekend for the great price of $2.29 each!
There you have it…..a super simple DIY that anyone can do!
I really love how my herb cans turned out & I can’t wait to start using the fresh herbs in my Summer grilling recipes!


Printfriendly